I think you’ll agree when I say: Garden design can be overwhelming!
In this ultimate guide to garden design you will find easy to follow, step-by-step instructions to start using immediately.
cub
There are 4 fantastic D.I.Y projects that you can print out and make yourself. Use them to make your garden look unique and save money.
Here is a summary of what’s included:
SECTION I – BEFORE YOU START
- 5 Critical Questions
- Checklist #1
- Garden Usage
- Garden Views
- Plant Growth & Likes
- Soil Types
- Checklist #2
- Map your Territory
- Checklist #3
- Best free garden design software
- Colourful Seasons
SECTION II – PLANNING
SECTION III – PLANTS
- Soil Type & Shade
- Info Graphic: Plant Shade Requirements
- DIY Info Graphic: Build the Ultimate Raised Bed
- Develop Your Soil
- DIY Info Graphic: How to Create Compost
- How to Water your Plants
- DIY Info Graphic: The W.E.T Test
- The Best Garden Watering Technique
- Checklist #5
SECTION IV – FURNITURE & PATIO DESIGN
SECTION V – UPCYCLING
SECTION VI – GARDEN LIGHTING
SECTION VII – PATHWAYS
SECTION VIII – SHEDS
SECTION IX – GARDEN BUILDINGS
SECTION I – BEFORE YOU START
I know you came here looking for an answer. And in this ultimate guide you will find many.
However…The ultimate garden is subjective.
What YOU think is amazing someone else might think is awful. So I would ask that you keep an open mind and get creative.
Think: What does your garden mean for you and what do you want to use it for?
Having said that…
There are some proven ways to make sure you get your garden design right for YOU. In this ultimate guide to garden design I will lay out exactly how you can do it, starting today.
So buckle up, get your notepad out and get ready to create an amazing garden. Big or small, short or tall, these tips, tricks and hacks apply to all…
5 CRITICAL QUESTIONS
Let’s get the essential parts out of the way first. These are critical, as it will influence how and where you go from here on in.
Answer honestly and write them down. Bet you thought I was joking when I said to get your notepad out…I’m no joker!
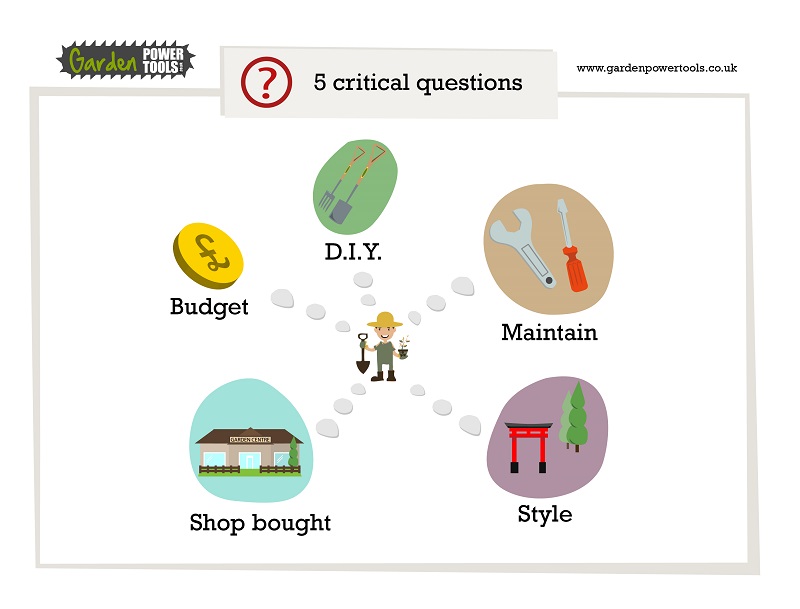
Q2: Are you prepared to do some work yourself? This will take a lot of time, so do you honestly have time to commit to it? How many hours per week? Be realistic. Getting a tradesman in may cost around £20-£30 per hour. Check out details here.
Q3: How easy to maintain does the garden have to be? Are you prepared to spend 2-3 hours a week maintaining your garden? Or pay someone to do it? If you’re looking for low maintenance, keep that in mind when choosing design ideas.
Lots of bedding areas with special plants may look good in the beginning but will soon require much work to keep looking good. Check out some London garden maintenance services.
Q4: Do you want some unique, DIY pieces in your garden or all shop bought? If you want a unique look you can create more DIY pieces, but it will take a lot of time and requires tools.
Shop bought will be quicker, easier and more professional but less unique and will probably cost a bit more. Or you can find a unique garden gift online.
Q5: What style do you want? This is key in deciding how you want the garden to look so that all the items you buy and make go together nicely.
If you want a country garden style, it’s unlikely that some modern, tiled and shiny items are going to be a good fit.
Checklist #1
1. Answer the above questions honestly and write them down
2. Think about them and see if you change your mind
3. Work through the remaining steps with these questions in mind
I have put together a helpful PDF of ALL the checklists in this guide. Download it for FREE so you can work through it easily.
[popup_trigger id=”1624″ tag=”span”]Download the free checklists PDF[/popup_trigger]
All of the below will be covered in more detail in later sections. These are just to get you thinking.
GARDEN USAGE
Think about how your garden is going to be used. For family days, having friends over, just for show or to play football with the kids?
There might not be a single answer, but what you use it for most should be considered in your design decisions.
Pathways and the flow of the garden are important points to consider for usage. For example, if you have a large flower bed you might want a few stepping stones to allow access to the middle without stepping in the mud all the time.
CHILDREN & PETS
Both children and pets will probably want some grassy areas to play in. If those areas are surrounded by delicate plants, prepare yourself for some re-planting and broken flowers. Ideally keep the two separated so you can rest easy without worrying things will get broken.
There are multiple angles that you need to consider. In the UK, you will probably spend a lot of time looking at your garden from inside your home. How do you want it to look from each room in your home? From upstairs and downstairs.
Putting a large water feature which blocks your view from the living room might not be what you want. Keep this in mind when planning where to put objects and plants.
PLANT GROWTH & LIKES
Many plants, bushes and trees that you use will require room to grow. Ensure you factor some room to grow into your planting plan.
Choose the areas that are most suitable for the type of plant you are using. For example, some plants like shade so make sure you accommodate them properly. More on this later in the plant shade info graphic.
SOIL TYPES
Only looking at the superficial aspects of your garden and neglecting the fundamentals such as soil types will lead to a poor garden. Make sure you take the time to discover what type of soil you have.
What is the pH level of your soil, for example?
And what kind of plants like that soil type? You can get a soil testing kit from your local garden centre or online from Amazon, here.
Note: If you buy a cheap soil tester they’re not always the most accurate. You get what you pay for so it’s worth investing a little more to make sure it’s right.
This is just a summary. There is a lot more information in the plants section below.
Checklist #2
1. List the 3 main uses of your garden
2. Do you have pets or children to consider
3. Look at your garden from each room in your home
4. Do you want plants, shrubs and trees that will grow much larger
5. Get a soil test done or buy a kit
I have put together a helpful PDF of ALL the checklists in this guide. Download it for FREE so you can work through it easily.
[popup_trigger id=”1624″ tag=”span”]Download the free checklists PDF[/popup_trigger]
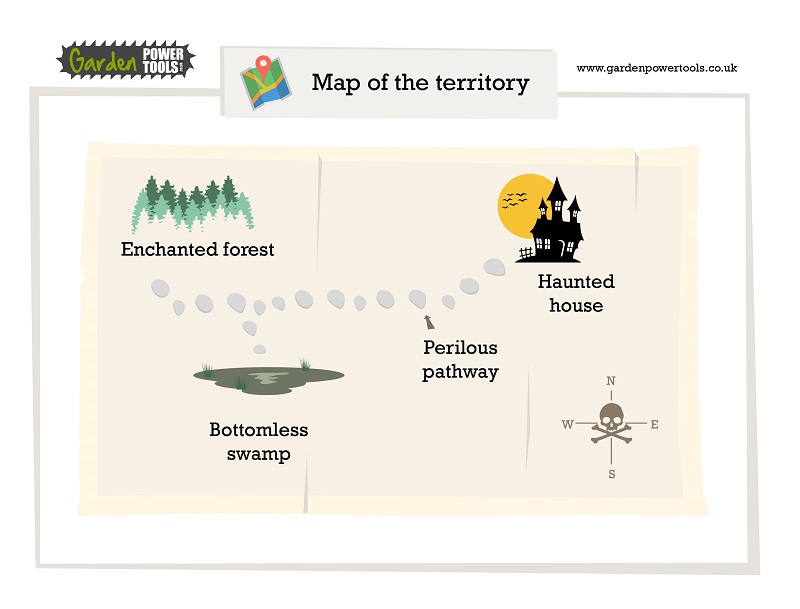
MAP YOUR TERRITORY
In order to get an understanding of how your garden is going to look, you’ll need to get those creative ideas in your head down on paper. There are three reasons for doing this:
1. What you think is good might not work out quite so well when sketched out
2. It will help you to see how it will all fit together properly in your garden space
3. You can use the sketch to show others what you mean – a picture says a thousand words
Pro Tip: Draw it to scale. Basically, go and measure your garden. Let’s say that it’s 10m long and 5m wide. You can draw a rectangle of 50cm x 25cm on paper and that will be a 20:1 scale.
Now, anything you draw into your sketch should also be 20 times smaller. So a 1m long flower bed becomes 5cm on paper (1m = 100cm. Divide that by 20 to get 5cm).
The reason for doing it this way is so you can work out exactly how much space items will take up without guessing.
All permanent items you purchase, such as paving slabs, archways, benches, sheds, etc can all be measured up and therefore added to your design to scale.
Checklist #3
1. Measure your garden
2. Draw up a scaled version of it
3. Add permanent structures to your design first
I have put together a helpful PDF of ALL the checklists in this guide. Download it for FREE so you can work through it easily.
[popup_trigger id=”1624″ tag=”span”]Download the free checklists PDF[/popup_trigger]
Bonus: If you would prefer to use computer software to draw your garden and really see how it will look, you have a couple of options:
1. Free software
2. Paid software
BEST FREE GARDEN DESIGN SOFTWARE
There are lots of free garden design software solutions out there. Some are always free, some have limited time trials. Usually the free trial ones are better because after the trial it’s a paid for service.
However, if you intend to only use it once then a free trial is all you need. Just make sure you have everything ready before you sign-up and remember to cancel…
There is a helpful summary of all the most popular garden design software solutions here.
COLOURFUL SEASONS
Living in the UK has its benefits…For one, we get a full 4 seasons. Which is great because it gives 4 very distinct looks to your garden.
Autumn is famous for the colourful red, browns and orange leaves you see on the trees. You can easily create this look in your garden with the right selection of small trees and bushes.
Taking advantage of the seasons in your garden means that you will be able to appreciate it all year round. Trees that shed their leaves, deciduous varieties, can add a lot of character to your garden.
Even when the leaves are on the ground they can add to the look and charm of the place. And the kids will love to play around in them.
Think about how your garden will look in each season depending on what you plant in it.
I love the idea behind Edible landscape design. It’s basically where you create an edible garden so you are self sufficient. There are some great ideas on their site about how to create a beautiful, year round garden.
Back to top
Back to section beginning
SECTION II – PLANNING
Before putting shovel to dirt, make sure that you know where the dirt is going. The first thing you want to know is what kind of style you want to go for. Below are some examples.
“If you fail to plan, you plan to fail” – Benjamin Franklin
GARDEN STYLES
Select one of the tabs below which best reflects the type of garden you wish to create for some inspiring ideas.
[tabby title=”Small”]
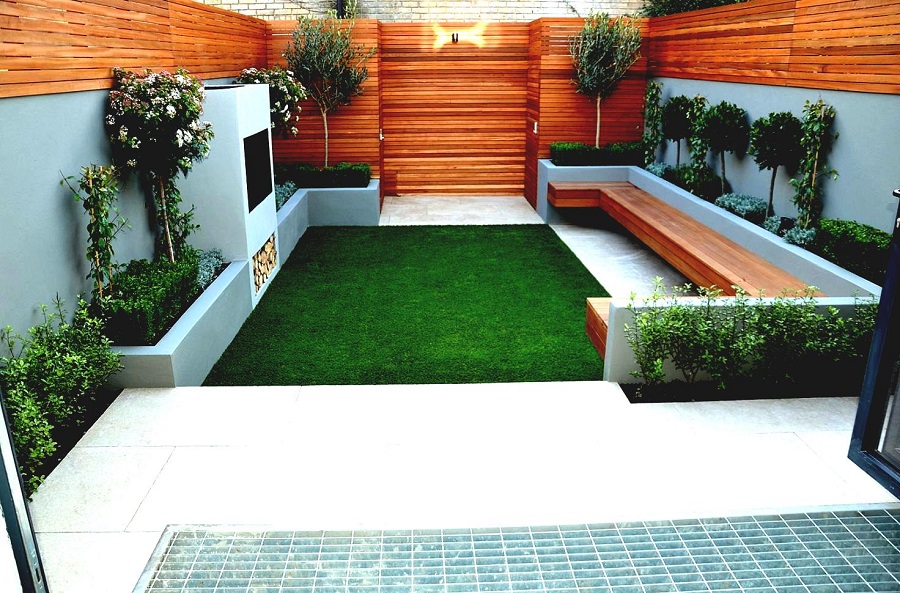
This is an excellent example of how a small space can be maximised. It looks very unique, contains plants, small trees, seating, a lawn area, lighting and a patio. Everything you would expect in a large garden.
[tabby title=”Urban”]
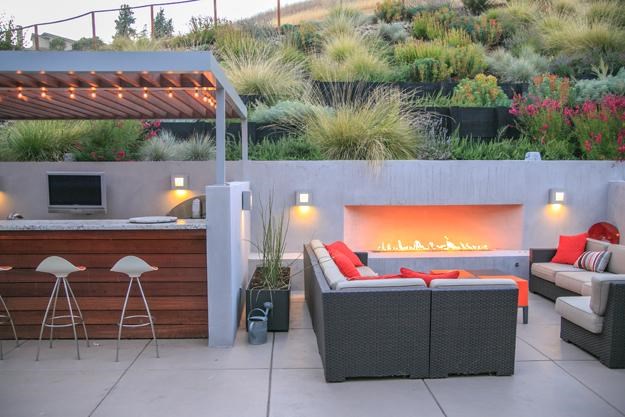
An urban garden is quite often going to be full of concrete, small and oddly shaped. But that’s not excuse to not add some plant life to it. Take this inspiring example from the Po Campo blog.
[tabby title=”Country”]
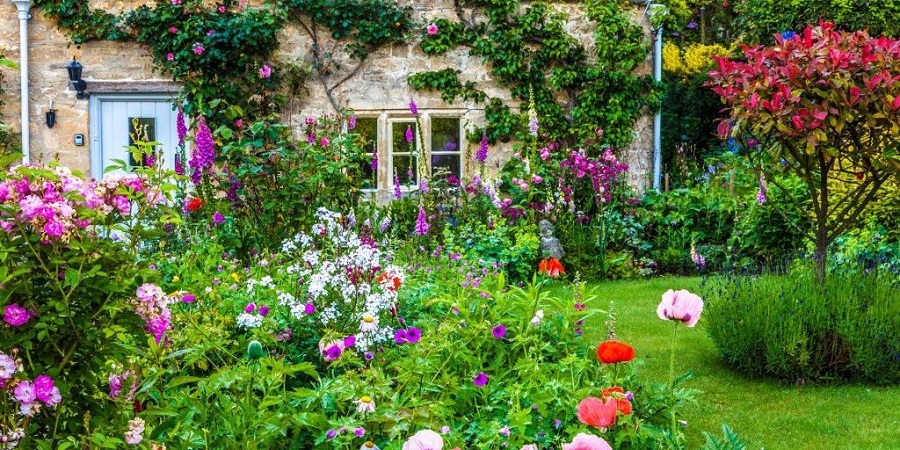
A country garden is usually associated with lots of space and brightly coloured flowers that seem to overflow onto pathways and plants climb the house. You’ll need a large space and a lot of time for maintenance to keep it looking good.
This is a great example of how it could look.
[tabby title=”Contemporary”]
A modern, contemporary garden design is based in the present. The look can vary a lot, but usually it would have higher spec features, include some kind of technology and be a place for social events so accommodate people well.
[tabbyending]
If you are still unsure what style to go for. You can mix them up a little if needed. Just think back to the 5 Critical Questions section and make sure your choices fit with your requirements.
You can use Pinterest to get some more inspirational ideas, so that’s what we’ll do next.
GET PIN-SPIRED
Now is the more interesting part. Getting some inspirational ideas from other places. It could be anwhere, but Pinterest, Twitter, Google Images and Instagram will have more than enough ideas to get you going.
Simply search for garden related ideas. Here are some to try out:
“Quirky garden ideas”
“Best low maintenance plants”
“Unique garden water features”
“low cost garden lighting”
I wrote another post which contains 33 quirky garden ideas, plus a couple of bonus ones in there…Check that out too for more inspiration.
Checklist #4
1. Create a pinterest account, it really is worth it for this part
2. Buy Garden Design Journal Magazine and 2 others from your nearest supermarket or online
3. Buy a scrapbook and use the magazines to cut out and stick on inspiring ideas
4. Divide your scrapbook into groups of pages, like flowers, water features, planters, etc
5. Decide what style of garden you want
I have put together a helpful PDF of ALL the checklists in this guide. Download it for FREE so you can work through it easily.
[popup_trigger id=”1624″ tag=”span”]Download the free checklists PDF[/popup_trigger]
BEST PLANNING RESOURCES
Here are some handy links to tools and resources that will help you with this section:
- Gardena garden design software
- Reviews of the best garden design software
- RHS Design Ideas
- Urban design ideas
Back to top
Back to section beginning
SECTION III – PLANTS
Soil type and sunlight are the two biggest factors affecting your plant choices. Another one is how much effort your are prepared to put in to maintaining them.
You don’t need to be an expert. That’s why there are garden centres and online forums. You need to do two things to ask the experts:
- Test your soil to determine its pH level
- Determine how shady the area is
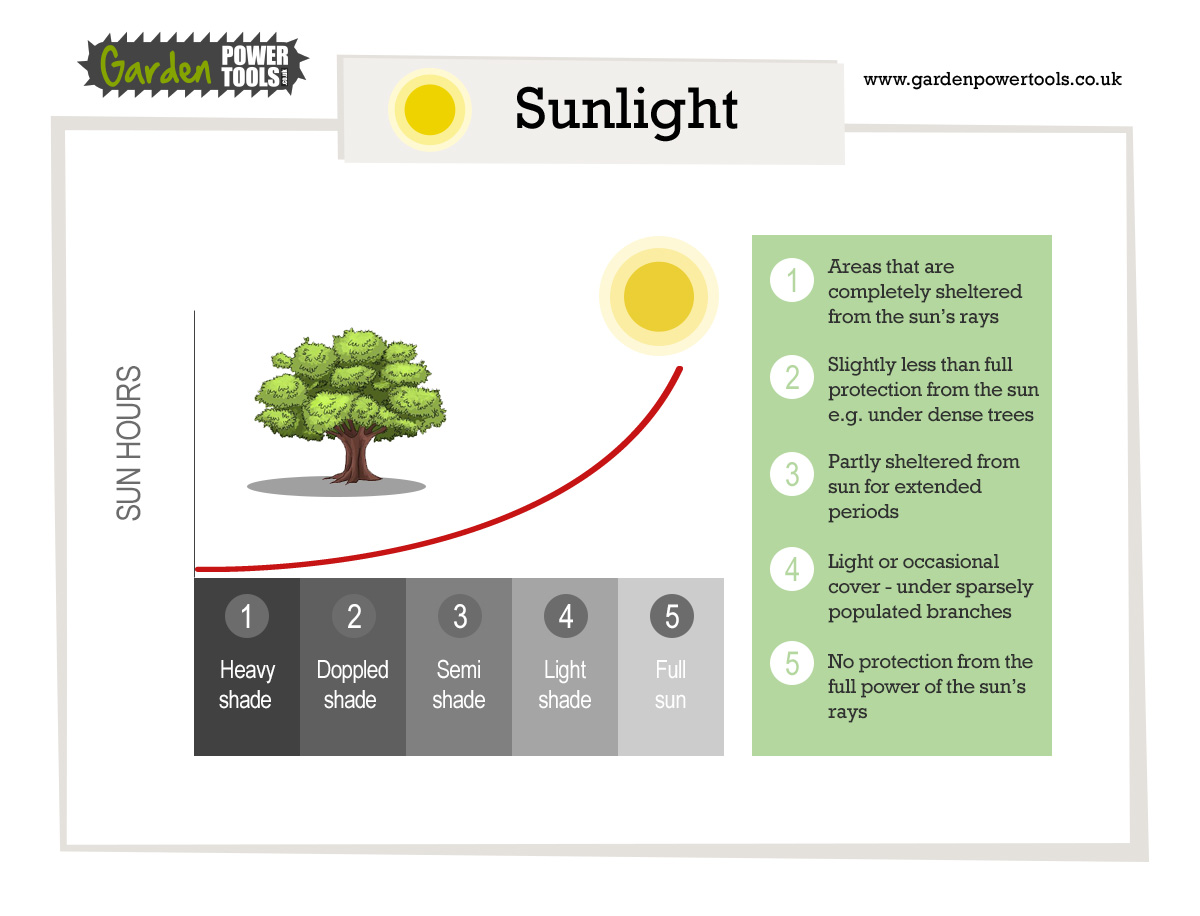
Use this handy diagram below to determine the shade levels and buy a pH soil testing kit from Amazon.
INFO-GRAPHIC: PLANT SHADE REQUIREMENTS
Armed with this information you can do a lot of plant finding yourself, but if you are unsure ask an expert at a local garden centre.
Pro Tip: Keep it local. Native plants to the area are ideal plants to use in your garden. They thrive in your environment, they’ll be resilient to the climate and the insects and probably low maintenance.
Back to section beginning
DIY INFO-GRAPHIC: BUILD THE ULTIMATE RAISED FLOWER BED
If you’re feeling brave, have a go at creating this raised flower bed. It would be a great edition to any garden and good fun to make.

Can also be seen here
You can develop better soil before you plant anything. That way you will ensure you give the plants what they need and they will thrive. Perennial plants usually require a fairly neutral pH level, of around 6.5.
Even plants in fertile soil will have issues if the soil is too acidic or alkaline, this is because the nutrients are unable to be disovled and absored by the plants. A good compost will usually neutralise the soil pH levels.
Pro Tip: Do some research to learn about the types of plant that best suit your soil type, shade and rain levels and plan your garden around them.
Check out the info graphic below to show you how easy it is to create your own compost for your garden.
DIY INFO-GRAPHIC: HOW TO CREATE COMPOST
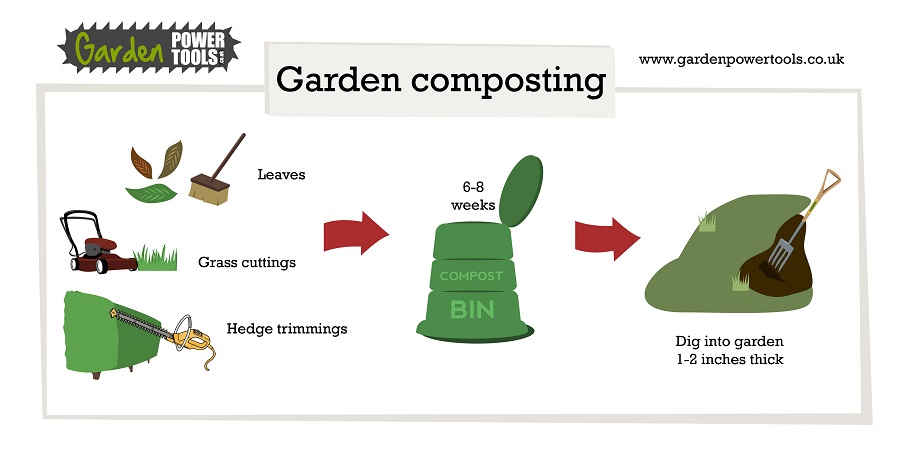
Note: The ones which are raised off the ground are ideal for protecting wildlife.
Back to section beginning
HOW TO WATER YOUR PLANTS
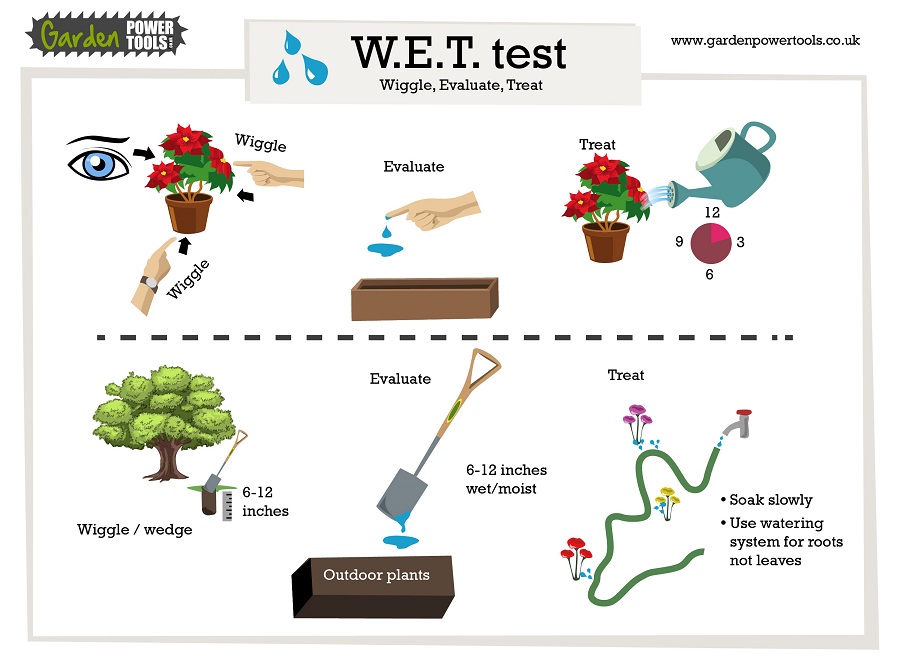
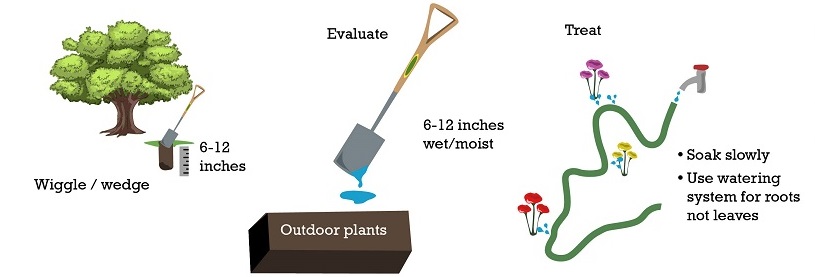
Watering your plants, shrubs or trees is a simple 3 step process. I call it the W.E.T test.
- Wiggle – Use your finger or tool to get into the soil
- Evaluate – See and feel the moisture
- Treat – Water if necessary
Whether indoors or out, potted or planted free, the process is the same. Use the W.E.T test. See the handy guide below to how you perform it on different plants.
DIY INFO-GRAPHIC: THE W.E.T. TEST
Back to section beginning
The Potted Plant
Potted plants are the easiest to test for moisture, but also require the most attention as they are more likely to vary between wet and dry very quickly.
Wiggle
- If in a pot, lift it up and feel the weight. Over time you will get to know what a dry and wet weight feels like. Once watered, lift again to know how it feels when freshly watered.
- Touch the soil to see if it’s dry. Wiggle your finger into the soil. How wet is it?
- Look at the underside of the pot, is it wet? Push your finger inside the drainage hole into the soil. How wet is it?
Evaluate
- Soil should be damp or moist.
- Too wet will result in root rot.
- Too dry your plant will die. It’s also plant dependent so make sure you Google how wet the plant likes it.
Treat
- Water slowly to the soil directly until the water runs out the drainage hole in the bottom of the pot. Avoid spraying water all over the leaves unless the plant specifically likes it.
- Watering too quickly, especially onto dry, hard soil, will result in the water not being absorbed to the roots and therefore still being dry where it matters.
The Garden Plant
Garden plants will fluctuate less in terms of extreme wet and dry, however you still need to keep an eye on them. Especially if they are newer and have less of a strong hold in the soil.
Wiggle
- Use a spade to dig down into the soil about 6-12 inches
Evaluate
- Remove the spade to look and feel for any moisture on the blade.
- Is the soil moist and a little sticky or bone dry?
Treat
- If bone dry, start watering
- Use a hosepipe to very slowly water the area
- You can use a watering can but that might take a while
Pro Tip: Get a soil moisture tester. This will save you time, money, water wastage and ensure your plants are adequately watered. Quite often they come with a pH soil tester, but they’re not always the most accurate if cheap.
You can also get a water timers, that you add to your garden tap and it runs to a schedule. This one from Gardena looks like it’ll work well and gets good reviews.
Handy Hint: Get a rain gauge and never have to guess again. Remember to empty it out each day. This is a basic one from Amazon or you can go high tech and get this one.
Back to section beginning
THE BEST GARDEN WATERING TECHNIQUES
Here are some DOs and DONTs when watering your plants.
DO
- Check the soil moisture before watering
- Water regularly, especially in dryer seasons
- Use a slow watering style instead of quick
- Water in the morning so leaves can dry out in the warming sun rather than stay wet all night
- Focus on watering the roots
DONT
- Water leaves as this can lead to disease and wastes up to 40% of the water which evaporates
- Don’t overdo it because too much water is just as bad as too little
- Water at night as the leaves may get wet, frosty and diseased
Checklist #5
1. Test your soil for the pH level
2. Know your shade types of the garden
3. Buy a compost bin
4. Try out the W.E.T test
I have put together a helpful PDF of ALL the checklists in this guide. Download it for FREE so you can work through it easily.
[popup_trigger id=”1624″ tag=”span”]Download the free checklists PDF[/popup_trigger]
Back to top
Back to section beginning
SECTION IV – FURNITURE & PATIO DESIGN
I think you’ll agree that maximising outdoor space is critical to succesful garden design. It allows you to have another living area in good weather.
You should aim to include your patio and garden furniture on your initial garden design sketch, as in Map your Territory.
#1 Sun
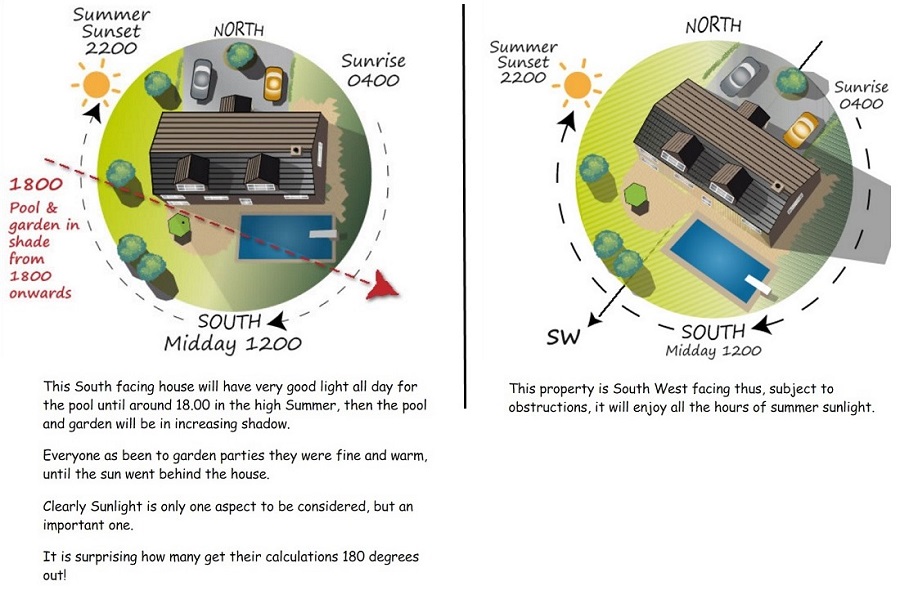
In the northern hemisphere you’ll most likely want to be south west facing to get the most sun. Seated areas might want shade and sun so people can still sit together and both types of people be satisfied.
Here is a great digramatically explained reason why you want to be South West facing and not just South facing. Credit to Sun Compass, who I would highly recommend checking out.
An umbrella or parasol here is ideal. If you have a parasol, you can purchase a parasol heater for those cooler nights. If not, I’d recommend one of these parasols.
#2 Practicality
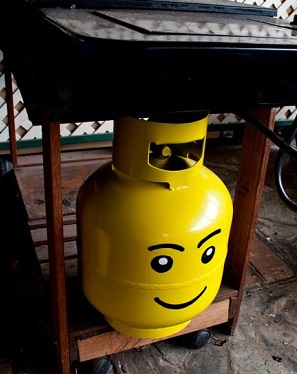
BBQs placed away from windows or areas which will burn. Expect smoke to cover areas so not next to white walls. Gas supplied or traditional coal? If gas, where will the gas cannister be housed? Ideally tucked away somewhere it can’t be seen or make a feature of it.
#3 Maximise Space Use
Maximise the use of seating space in small areas. If you have a small garden area you need to maximise your use of it.
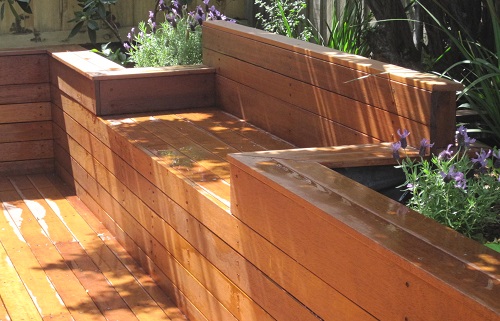
Going vertically rather than horizontally is one option. Chairs take up a lot of space, so why not sit on top of something? Build seats into wall tops, for example.
#4 Storage
Where will you store your garden furniture when winter comes? Do you want all year round furniture so you don’t have to store it away or some with cushions that need storage?
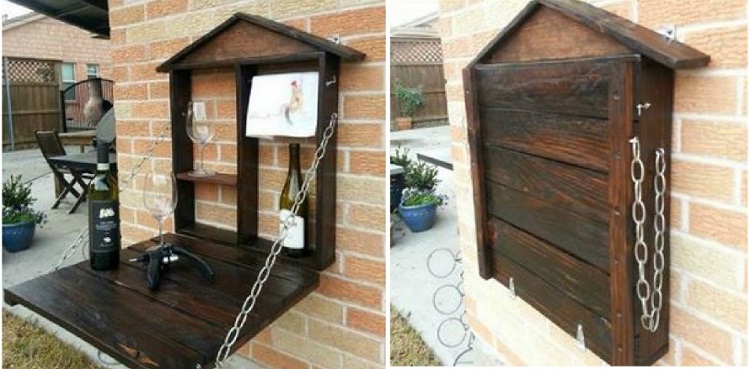
Take this beautifully designed, space saving and quirky idea for a wine table.
#5 Good Views
Make sure the views from your seating and patio areas are of what you want them to be. As in towards some nice landscape features and not towards a brick wall.
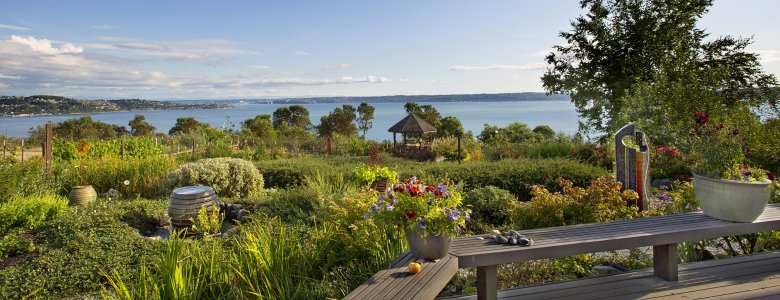
You might not be able to get the kind of view below, but it’s something to aspire to…
Source: Seattle Times
How will it all look from the house? Make sure that you don’t restrict views from your home by placing garden furniture in the way.
Back to section beginning
PRACTICAL PATIO QUESTIONS
If you’re not careful your patio may turn into a patio from hell…You might think it’s just a case of laying down a few nicely cloured slabs, but that couldn’t be further from the truth.
Answer the following questions:
- What purpose is your patio for? E.G. To have dinner on with a BBQ in the summer
- How many people will be on it? E.G. Just two people, and sometimes 4
- If more people come, can they be close by? If you enclose your patio with brickwork or flower beds, people might feel left out and not be able to get in on the action
- What will be on the patio? Chairs and a table, a BBQ, a play area for the kids?
Does size matter?
The experts over at Alda Landscapes have this to say on the matter:
“As a rule of thumb, 3m x 3m is a sensible size for a typical patio with a table big enough for 4 or maybe even 6 people”
In fact, they have a great article on the subject of patio design so be sure to check that out.
Checklist #6
1. Which direction is your garden facing?
2. How many people will your patio need to hold?
I have put together a helpful PDF of ALL the checklists in this guide. Download it for FREE so you can work through it easily.
[popup_trigger id=”1624″ tag=”span”]Download the free checklists PDF[/popup_trigger]
Back to top
Back to section beginning
SECTION V – UPCYLCING
No, I’m not referring to the type that happens at the weigh-in of a boxing match. This is a new kind of trash talk with the same amount of buzz as a pre-fight press room.
Upcyling is one of the latest crazes to sweep across the globe. And rightly so, as it involves recycling and creating unique pieces of art. Making use of this in your garden can be a good thing if done right…
BENEFITS OF UP-CYCLING
Aside from the environmental and economic advantages of up cycling, I believe most people do it because of the unique and quirky final product they will get. You can check out my 33 quintessentially quirky blog post for some examples.
SMART UP-CYCLING
I was thinking about adding some ideas in here, but to be honest there are millions out there already…These awesomely actionable ones from Cube Smart are worth checking out.
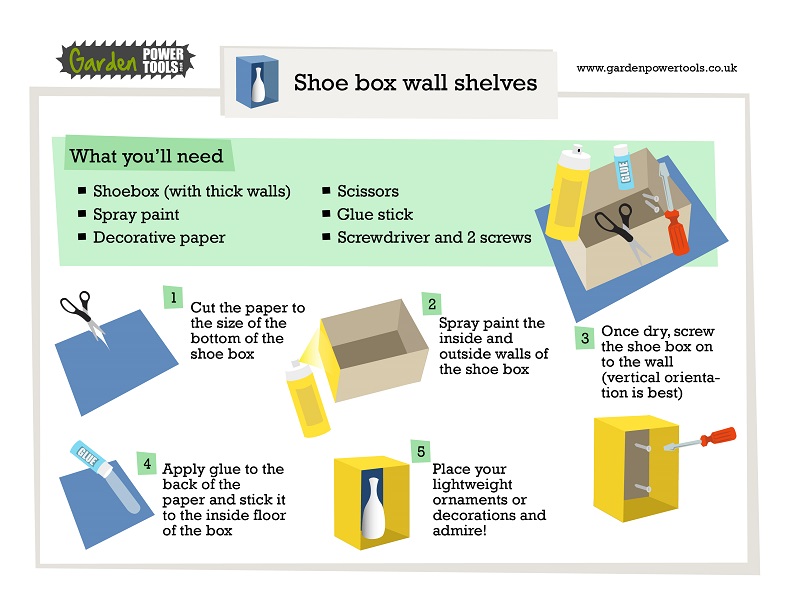
But I couldn’t resist adding just 1 in here…I love these up-cycled shoe boxes. Unless you have OCD tendencies, you probably throw most of your shoe boxes away. Now you can legitimately keep and re-purpose them.
This info-graphic was inspired by the guys over at Creme de La Craft.
Checklist #7
1. Do you want to upcycle?
2. Get some ideas from Pinterest and pin them to your board
I have put together a helpful PDF of ALL the checklists in this guide. Download it for FREE so you can work through it easily.
[popup_trigger id=”1624″ tag=”span”]Download the free checklists PDF[/popup_trigger]
Back to top
Back to section beginning
SECTION VI – GARDEN LIGHTING
Lighting your garden at night gives you the best opportunity to showcase the bits you like and hide in the shadows the areas that are not so desirable.
With the right lighting, you can change the look and feel of your garden. Light reflects and creates long shadows, meaning your garden can be transformed into a new one at the touch of a button.
And you don’t need to use large, expensive and powerful bulbs. The use of solar powered and LED lights ensure low power, efficient energy usage.
Back to section beginning
ENERGY EFFICIENCY
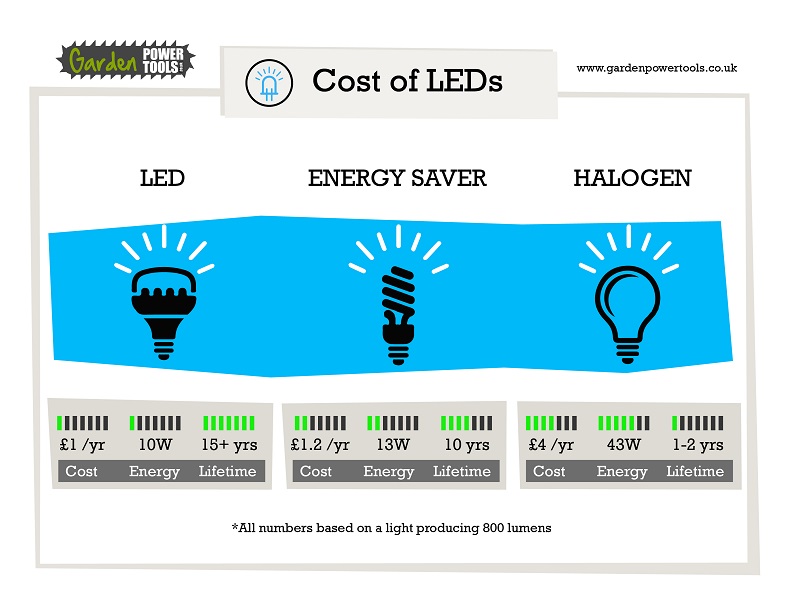
LED lights can use as little as 1w per light and look stunning. You could easily selectively light up your garden for less than 50w in total.
There are two mains reasons to use LEDs as your main light bulbs:
- They last longer
- They cost less to run
Check out this informative info-graphic below to see how much more costly traditional bulbs are compared to LEDs.
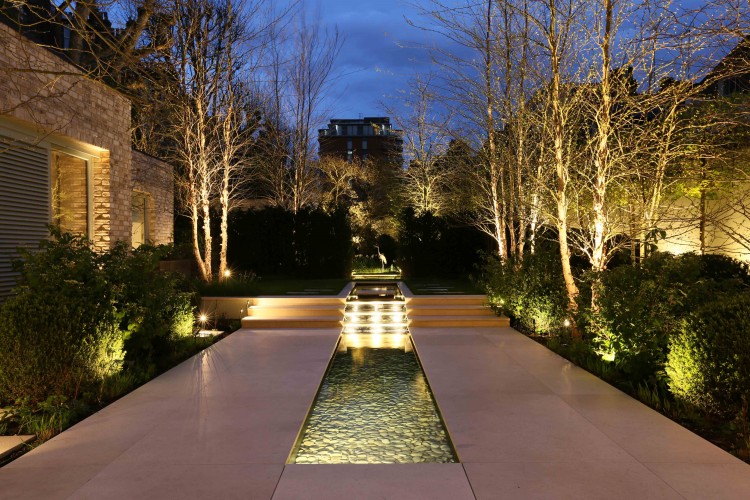
I love the look of this garden design by John Cullen Lighting. It’s simple yet elegant and really accentuates the details on the tree branches.
Checklist #8
1. Decide if you want to use lighting in your garden
2. Add 8 design ideas to your Pinterest board
I have put together a helpful PDF of ALL the checklists in this guide. Download it for FREE so you can work through it easily.
[popup_trigger id=”1624″ tag=”span”]Download the free checklists PDF[/popup_trigger]
Back to top
Back to section beginning
SECTION VII – PATHWAYS
Pathways lead you somewhere, but that is not their only purpose. If it was, all pathways would be straight and the same style. A well designed path through your garden does much more than get you from A to B.
They can open up areas, divide regions, segment sections and provide a flow through your garden. They allow a visitor to admire the areas of your garden while en-route and act as a way for you to decide what route your visitors take.
3 PATHWAY COST CUTTING TIPS
#1 Get Involved
If skilled labour for laying the path is the expensive part, ask if you can do the majority of the preparation work for them so the labourer can just lay the path. This usually just requires marking and digging the pathway out.
#2 Upcycle
Up cycling is a big trend at the moment. You can use pretty much anything that would be thrown away and create something useful from it.
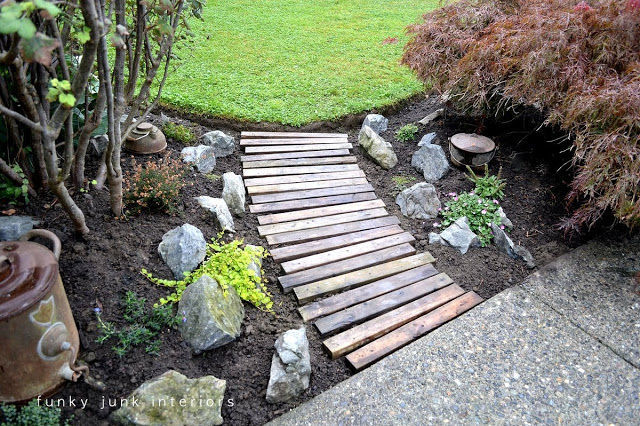
For your garden path, take a broken old pallet from any builders yard which you can get for free and use the slats to create a walkway.
Source: Funky Junk Interiors
#3 Mix n Match
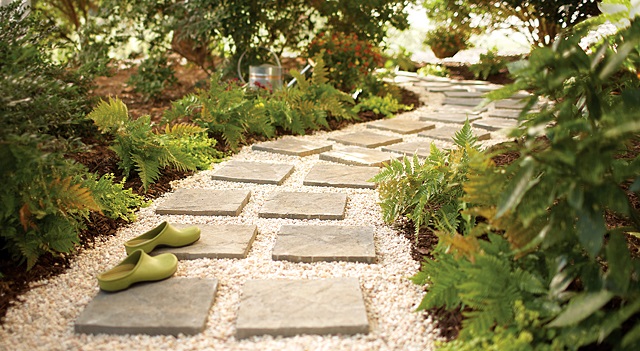
If you’re worried about cost, one way to keep it down is to use mainly a cheaper material with the more expensive items dotted around for style. For example, a gravel path with paving slabs like below is cheaper than a full on paving slab path.
Back to section beginning
TYPES AND STYLES
Traditionally you think of a pathway as stone slabs in the grass. But it doesn’t have to be that way. You could use gravel, for example:
Source: The Home Depot Blog
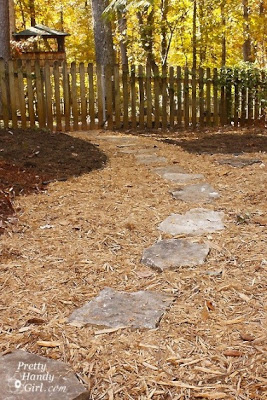
It goes to show that you don’t need to pay a lot of money to get a good looking path. With a little determination and being prepared to get your hands dirty, you can do it yourself.
Mulch and gravel pathways are easy to lay and don’t require and kind of solid foundation because the stones and chips move around.
Pro Tip: Dig down a few inches and use some larger stones underneath to create a well drained base, then cover it with liner to prevent weeds from growing through.
The handy info graphic I created below should help you with how to build a gravel pathway yourself.
DIY INFO-GRAPHIC: BUILD A GRAVEL PATHWAY
Checklist #9
1. Decide on what style of pathway you want
2. Mark it out on your map if not done so already
3. Cook your partner a meal before asking them to help you dig!
I have put together a helpful PDF of ALL the checklists in this guide. Download it for FREE so you can work through it easily.
[popup_trigger id=”1624″ tag=”span”]Download the free checklists PDF[/popup_trigger]
Back to top
Back to section beginning
SECTION VIII – SHEDS
PLANNING PERMISSION FOR SHEDS
Question: “Do I need planning permission for my shed?”
Answer: “Probably not, but in some cases you might…”
Explanation: The probably not part is because most sheds are not too large or too high. Height and size are the biggest restrictions most UK residents will face when planning their sheds.
Here is a summary of the type of shed you can build without planning permission:
- It’s in your back garden, not your front garden – it cannot be forwards of any wall that faces a road
- The shed is only used by those who live in the house
- The shed is a single storey in height and no more than 2.5 metres
- It’s not for living/sleeping in
- The structure is less than 15 square metres
- Any wooden shed should be at least 2 metres from your home
- The shed should not be within 2 metres of any boundary
- The roof of the shed is no more than 4 metres high in total if a dual pitched roof or 3 metres if any other type of roof
- The shed should not cover more than half the available land around the original building
Please note: that I am no expert. This is just a simplified version of the rules and my interpretation of them. Please get expert advice if you are unsure and read through the full documents which are available on the government website.
Although in most cases you will not need to get planning permission for your shed, I would still recommend speaking to your neighbours.
Pro Tip: Neighbourly disputes in the UK are quite common so letting them know what you are doing is polite and if they can see it from their garden or house it’ll help to keep them onside and not complain.
Back to section beginning
LOCATION, LOCATION, LOCATION
Now the legalities are out of the way, the next question is “Where should I put my shed?”
Most people place them towards the end of the garden in the corner. This is good because they are out of the way and don’t take up too much space. Keep these points in mind:
- Is the ground level? The area will have to be leveled before building a shed
- Is it too close to any boundaries. Leave some room so you can paint and maintain the shed easily
- Will it be likely to get hit if winds and storms blow down branches from the trees. Probably not too much of a worry but it can happen. Ideally your trees should be well maintained to ensure there are no dangers of falling branches
Use of the shed – Are you going to use daily, as a work-space, or just for storage?
Access – based on frequency of use, if used more often it will need to be easy to access. Will there be a pathway or closer to the home? What will it be like getting to it in the wet, wintry month vs summer?
Power – do you need electricity in there for lighting or tools?
Insulation – if you sit in there in the winter it’ll need to be insulated.
Roof style – dual pitched, mono pitched or flat. Flat ones can have a water butt on there for collecting rain water to use for watering plants.
Add grass and small plants to the shed roof. This helps to keep the shed cool in summer and warm in winter.
Size and Space – use hanging brackets for bikes and shelves to maximise vertical space. Get folding chairs and tables if you plan to keep that stuff in the shed over the winter.
Security – How will it look and what are you keeping in it at night. What access is there to it without you seeing or hearing anything?
Back to section beginning
Checklist #10
1. Ensure your shed idea does not require planning permission
2. Decide where you will place your shed
3. List 10 things that will be kept in the shed and think about how much space you need
I have put together a helpful PDF of ALL the checklists in this guide. Download it for FREE so you can work through it easily.
[popup_trigger id=”1624″ tag=”span”]Download the free checklists PDF[/popup_trigger]
Back to top
Back to section beginning
SECTION IX – GARDEN BUILDINGS
Your garden doesn’t have to be just for plants, flowers and a small shed to store your mower in. With space at a premium, many are converting their gardens into usable spaces with purpose built buildings.
For example, many use their garden to create an office or work space. A building which requires no planning permission can be erected quickly and keep costs down.
So, what should you consider when creating an office or work space in your garden?
SIZE & STYLE
How your new structure sits in the garden is very important. Not only the size, but also the style. Try to pick colours, roof styles and styles that will work in your garden. A concrete and metal building in a traditional style country garden probably won’t work.
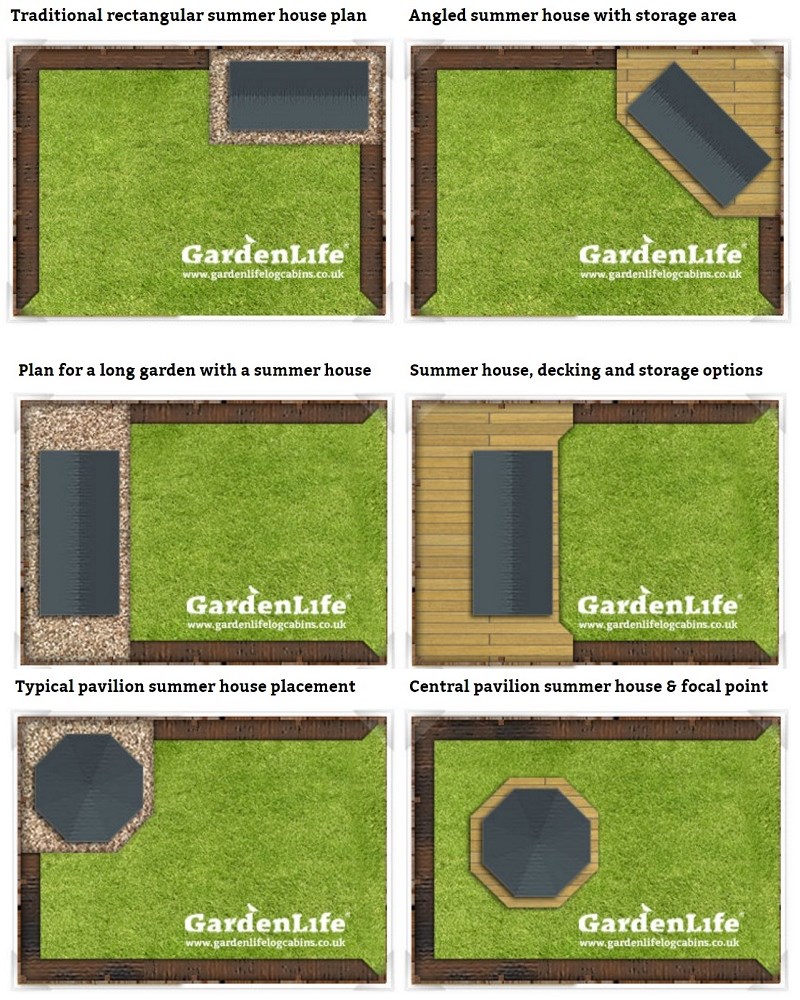
“To help visualise how a building will sit within your garden use tent pegs or canes to mark out its dimensions” – Garden Life Log Cabins
Your planned use of the garden will help sway your decision about some other important decisions you have to make, such as:
- Log thickness – Thicker for winter use, thinner for summer only use
- Window type – Plastic for summer use only, double glazed glass for winter
- Longevity – A longer lasting structure requires higher quality materials
These are just some of the factors involved. I’d highly recommend checking out this post which details all the information you need, from the experts at Garden Life.
Back to section beginning
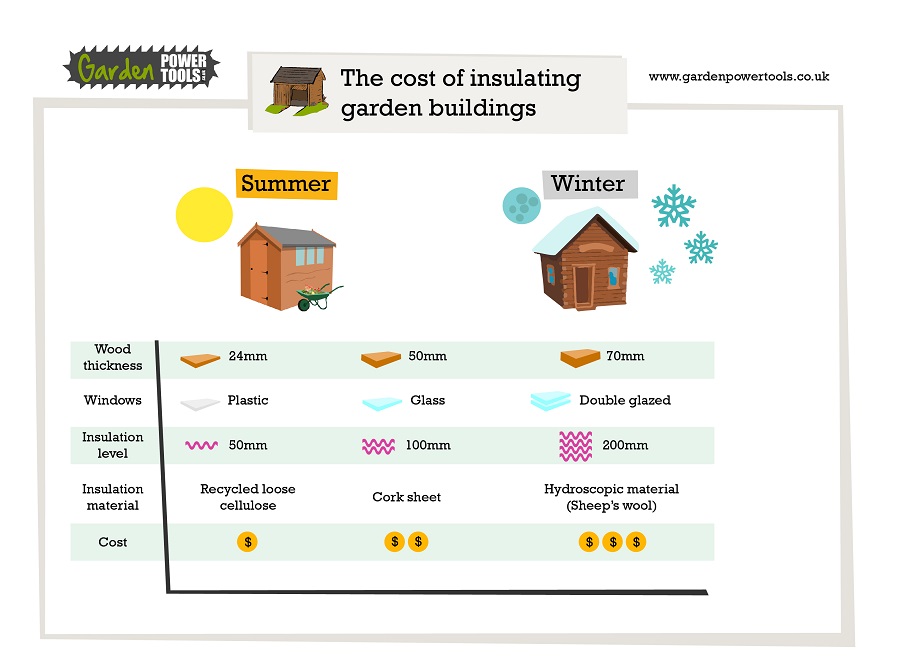
INFO-GRAPHIC: INSULATING GARDEN BUILDING COST
A very important consideration depending on how you intend to use your garden building, especially as an office or work space in the winter. But insulation is not just important for the winter, it’s necessary to keep the warm out in the summer, too.
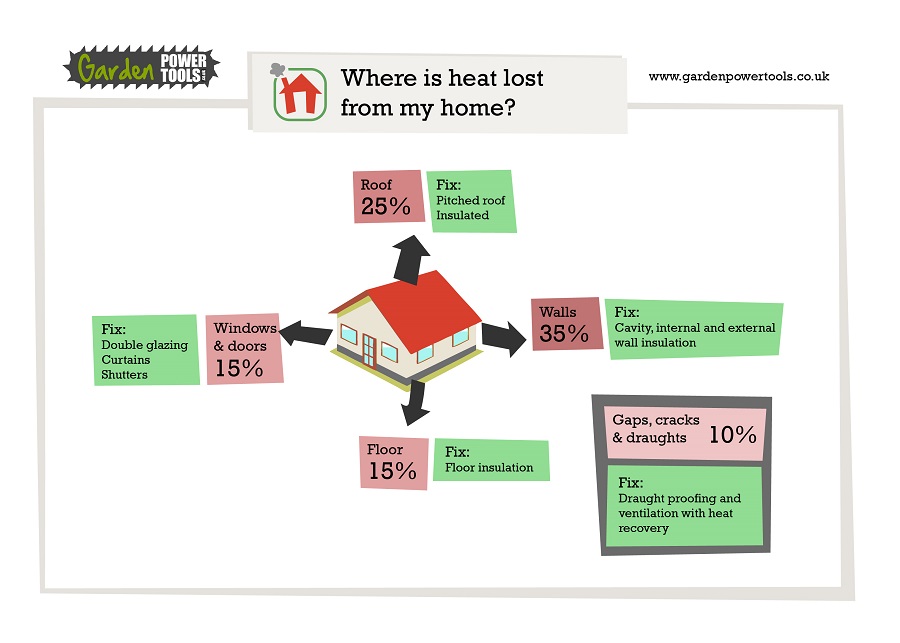
INFO-GRAPHIC: HEAT LOSS, THE BIGGEST LOSER
Insulation Material – A hydroscopic material, such as sheeps wool, is a natural and effective way to insulate your garden building. The downside is that it’s expensive. Other options are cellulose and hemp. Check out this post for some more details on that.
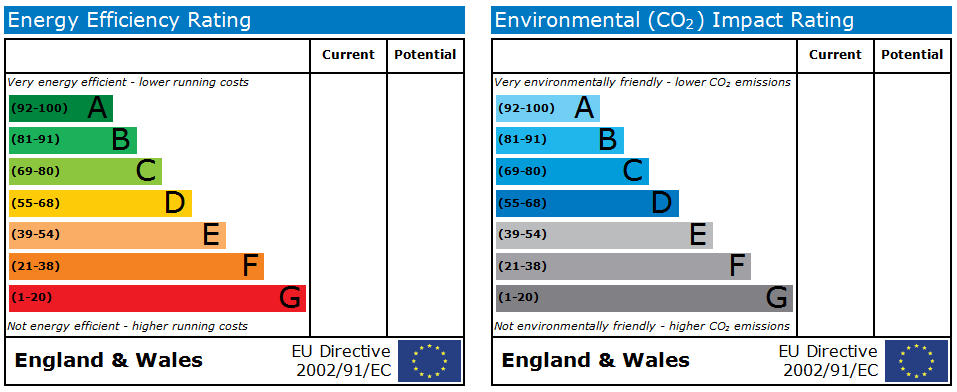
Warmth Ratings – When you purchase a house you may have noticed the EPC certificate which shows you how good the energy rating is of the property.
In a similar way, you can find out what insulation rating a product has. There are two values for this, which are:
- K Value – Thermal Conductivity of Material
- U Value – Heat Transfer Properties
In simple terms, the lower the K-value and U-value are the better because the material will conduct less heat. So heat cannot transfer through it, stopping heat being lost or allowing it to enter.
As said before, this is relevant in both summer and winter, as it’s cold or warm air which is the heat we don’t want to transfer one way or the other.
Here is a more detailed guide that will help explain everything with complete lists of the best insulation materials to use.
Design Ideas
Looking for inspiration is a good way to get some ideas down. Places such as Pinterest, Google images and Instagram are great places to start.
Once you have a few ideas down, as is outlined in the beginning of this guide, looking at some more concrete plans from the experts is recommended.
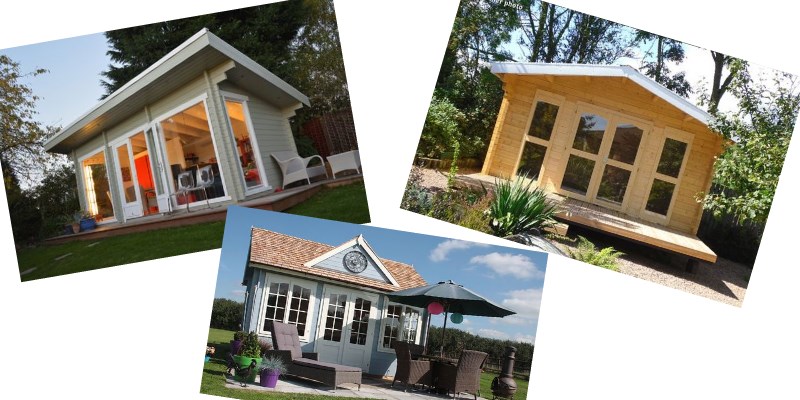
Garden Life design, build and erect log cabins of all kinds; from summer houses to office spaces. They have years of expertise so I would recommend looking at their site. Below are a few design ideas from them.
Checklist #11
1. Decide if you want a garden building, such as an office
2. List what you will use your garden building for
3. How many seasons does it need to be used in?
I have put together a helpful PDF of ALL the checklists in this guide. Download it for FREE so you can work through it easily.
[popup_trigger id=”1624″ tag=”span”]Download the free checklists PDF[/popup_trigger]
That’s the end of this Ultimate Guide to Garden Design. I hope you found it useful. To make the most of it download the checklist PDF and work your way through each section.
You can switch between sections as you like depending on which ones are applicable to you.
Now share this with a friend who you think would benefit from this guide.

